
Your objective for this project is to design a creative and expressive typeface from three basic shapes. Of course, all letterform design is modular, in a way. Once you have a stem, curves, transitions, and the like, you can use those parts and pieces to create an entire typeface. That’s exactly what you are going to do, but with just a few shapes. Often, we think of the bauhaus and their heavily geometric and modular ideas. Here’s a link to a great looking workshop on modular type.

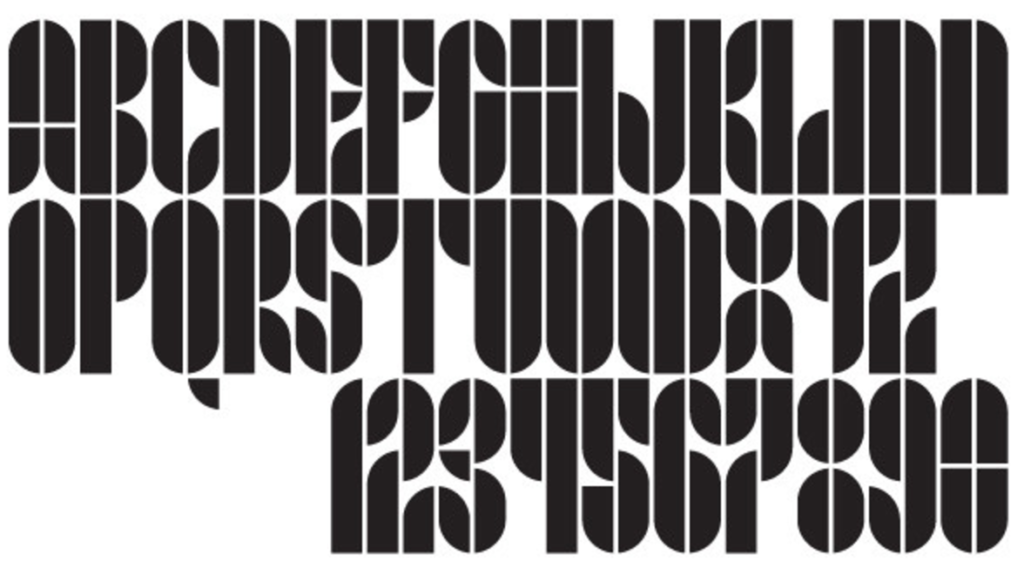
- You will begin by drawing your modules on graph paper. Try out a few different combinations of shapes. Try a circle, square, and quarter-circle. That would yield a typeface like Josef Albers’s Kombination Schrift above. Then maybe try some less geometric, more organic shapes. Then mix the two styles together to get something new and interesting.
- Then test your design by designing a series of letters and numbers with those modules. You might instinctively start out with A, B, C, etc. But that isn’t really the best way to go. Instead, start out with A, E, N, S, G, and 2.
- Next, transfer your final selection of modules to clean, white paper and carefully cut them out. Use the cut out shapes to create upper-case A through Z, and 0 through 9. Trace the shapes with pencil and fill in with marker on white paper.
- Scan the results of your tracing and markering and digitize in Illustrator.
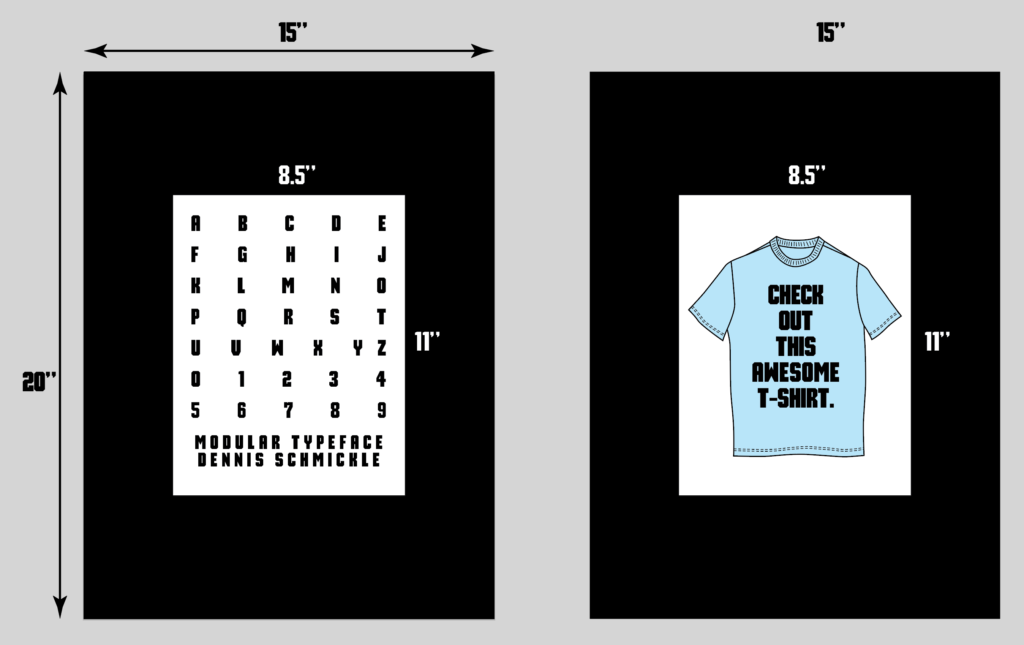
- Design something (not a poster) with your new typeface. Of course, this typeface will function as a display typeface, rather than something like body copy. And you will not be able to install a font file and type with it. BUT, you can still set headlines or a logotype with it by dragging letterforms around in Illustrator.
- When that is finished, you will print and mount two sheets of paper on two 15″ x 20″ boards. One will be your new typeface: A-Z, 0-9, the name of the typeface, and your name set in that typeface. The other is the thing that you designed with that typeface. (Put you name and class on the back of the boards) See below…
PROJECT OBJECTIVES
- Design with your hands
- Design a typographic system
- Implement a creative typographic solution
- Analyze typographic design processes
PROJECT TIMELINE
Mon Oct 03
Draw shapes (modules) on graph paper
Test by designing characters with those modules on graph paper
Wed Oct 05
Guest speakers!
Mon Oct 10
1. Transfer and cut out graph paper character drawings from white paper
2. Create A-Z and 0-1 from modules by tracing with pencil and filing in with sharpie on white paper
Wed Oct 12
Scan results to digitize and redraw in illustrator
Mon Oct 17
Set type with vectorized letterforms (Not a poster?)
Wed Oct 19
Continue designing with new typeface
Mon Oct 24
Turn in 15”x20” black mat boards: One with A-Z, 0-9. One with the thing you’ve designed.
PROJECT COMPONENTS
• 15” x 20” board with A-Z, 0-9, name of typeface, and your name
• 15” x 20” board with example of design with your typeface
• Project Notebook
EXAMPLES


